
Guide
- Troubleshooting
- Hard Brake Pedal
- Brake Pedal Ratio
- Picking the Proper Vacuum Hose
- Brake Drag
Rule number 1 in diagnosing a brake problem is to remember that a brake system is a very simple hydraulic system. DO NOT overthink it. Get back to the very basics and take a logical, systematic approach and finding the problem will be much easier.
The Most Common Reasons for a Poor Brake Pedal:
- The bleeder screws on the calipers are not facing up
- The master cylinder was not bench bled or was not bled completely
- Defective rebuilt master cylinder with pitted cylinder bore or defective pressure seals
- Master cylinder bore size too small for the system volume requirements
- Use of a disc/drum master for a 4 wheel disc system
- Master cylinder lower than the calipers or wheel cylinders
- Lines or components near a heat source
- Lines that loop up higher than the master cylinder and then come back down. Will trap air
- Low drag metric calipers without the use of a quick take up master cylinder
- No residual valve to rear drum brakes
- Drum brake wheel cylinders too large
- Silicone brake fluid. It can tend to trap air and cause seals to swell. In addition, if Dot 5 is used and it comes in contact with Dot 3/4, it can become a sludged up mess!
- Rear caliper parking brake / pistons not set properly with a rear disc system
- Rear calipers not being bled properly. Most brake problems with four wheel disc cars comes from the rear
- Improper pedal adjustment with too much free play
- Old or inferior quality brake hoses
How to Properly Diagnose a Brake Problem:
If you have very poor brakes, a spongy pedal or no pedal at all you will have to do some diagnostics to determine where the problem is in your braking system. Is it in the master cylinder, the front brakes or the rear brakes? These tests assume that your system is properly installed and bled. Perform these simple tests to find where the problem is. Once you know where the problem is it will be much easier to fix.
- Disconnect the brake lines from the master cylinder while leaving it on the vehicle
- Obtain inverted flare plugs for the master cylinder outlets with the correct thread pitch. These are available at any good automotive auto parts store
- Plug the master cylinder outlets. Step on the pedal and hold pressure for about 30 seconds. If the pedal remains firm then the master cylinder is good.If the pedal sinks to the floor then the cylinder is bad
- If the master cylinder is fine, connect the line to the front brakes. If the pedal remains firm then the problem is not coming from the front brakes. If the pedal sinks to the floor or is excessively spongy then the problem is with the front brakes
- Connect the rear and if the pedal goes bad then the problem is in the rear
You may also check whether your lack of a pedal comes from the front or the rear quickly this way. If you are sure the master cylinder is good, clamp off the front rubber hoses and try the pedal. If you get a good pedal then you know the problem is from the front calipers. Be very careful not to damage the hoses and try to protect them from damage by placing the hose between something smooth. There is a special tool sold in auto parts stores for this purpose. Try it on the rear if the front is fine.
Do you have a brake pedal that feels hard to press?
You may have a bad booster, booster hose, or check valve. In this 'How To' post, we offer a simple checklist to help you diagnose potential causes of a hard brake pedal.
If you can’t get a pedal please perform these tests before calling! Click here to download a printable PDF version of these troubleshooting tests. If you are unable to diagnose your problem and decide to give us a call, please have your customer order number ready. Our commitment is to guide you in selecting the right kit for your application and be here for you all the way through installation.
1. Not Enough Vacuum. The most obvious cause for a hard pedal is simply not enough vacuum. Any brake booster requires a minimum of 18” vacuum to operate efficiently. Anything less than that will contribute to the pedal being harder to push. If your vacuum is in the 16” to 18” range, a vacuum canister might help your situation. If below 16” of vacuum, an electric vacuum pump might be your best option.
2. Wrong Hose. Check the hose running to your booster. It is not uncommon to ask for 3/8” vacuum hose at your local parts store and the kid behind the counter doesn’t have a clue that there is a difference between vacuum hose and fuel hose. He just knows it’s hose. Fuel line is not designed to resist sucking shut like vacuum hose. It will only resist expansion. Therefore, if you have the wrong hose and it is sucking shut, it doesn’t matter how much vacuum your engine makes if it is never getting to the booster.
3. Defective Valve. The brake booster check valve could be defective. This is something easily overlooked. To check, remove the valve from the booster and disconnect from the hose supplying vacuum. Blow into the valve on the hose booster side. If air travels through and comes out the hose side, then you have a bad check valve. If you are unable to blow through, reinstall the valve and look for a different problem.
4. Bad Booster. The booster could be bad. There is a quick and simple way to check this. Follow the steps below:
- With the engine not running, press and depress the brake pedal several times to remove any vacuum from inside the booster
- On the last push of the brake pedal, hold moderate pressure on the brake pedal. Don’t push like you are panic stopping, simply hold pressure like you are sitting at a red light
- Start the engine and pay attention to what happens to the brake pedal
- If the pedal drops slightly, then the booster is working correctly
- If the pedal does not move at all, then there is a very good chance the booster is bad
If all of these systems above check out, it’s time to look at some other areas. From here, the diagnostics are a little more complicated than the simple tests listed above. Here is a list of possible things to check:
- Are you running a combination valve in your system? Is the valve still centered or has it tripped to one end or the other? If it has, this could be causing your hard pedal
- Do you have drum brakes? If so, make sure the wheel cylinders are traveling freely and not stuck
- What kind of pedal ratio do you have? On a power brake system, it is recommended that your ratio be 4:1. Many older vehicles in the 50’s used a pedal ratio of 1:1. This will not work on cars equipped with a vacuum brake booster
- Is your brake booster correct for weight of the vehicle? Using too small a brake booster on a heavy vehicle will give a hard pedal
Whether your vehicle has power or manual brakes, pedal ratio is important. If you are experiencing a hard pedal you should check your pedal ratio if you have converted from the vehicle’s OE set up. As a general rule, your pedal ratio should not exceed 6:1 for manual brakes with a 1” bore master cylinder and 4:1 for power brakes with a 1-1/8” bore master.

Because we are gear heads, we take every chance to look under the hoods during car shows and swap meets. One of our guys just got back from a big show and he was surprised by how a mistake he saw so many times.
To use his words, “How could something like this be wrong on so many vehicles?”
Since we are in the brake business, we notice more things when it comes to a vehicle’s braking system than most classic car enthusiasts. Kind of like the house painter that can’t walk into a room without checking the paint line between the wall and the ceiling.
So what was it that our resident gear head noticed? About half of the vehicles he saw had a power brake booster with the wrong type of hose going from the engine vacuum source to the brake booster.
Our Discovery Led Us to Experiment
This discovery got us curious, so we did an experiment. Whenever a booster/master combo is purchased from Master Power Brakes, we include several feet of the proper vacuum hose with each package.
Getting back to our question and our experiment, we wondered what happens when the average weekend garage guy goes to the local parts store to buy a brake vacuum hose. We went to a parts store and asked the counter guy for a “3/8 vacuum hose” (assuming that is how most people frame their request). The counter guy produced a 3/8” hose, per our request, but it wasn’t a vacuum hose.
Why does that matter you ask? Let’s explain.

From the outside, a fuel hose and a vacuum hose look similar. Both hose types are made from black rubber and both have an inner lining. Based on this, they should be the same, right? Wrong!
A fuel hose is built to resist expansion so it doesn’t burst under heat and pressure. That is opposite of what you are looking for in a vacuum hose. A vacuum hose needs to resist sucking shut. As your engine is running and creating that vacuum on the booster, it is going to try and close the hose. If you are mistakenly using a fuel hose, there's a good chance your hose is closing shut.
This creates a very inconsistent, and possibly, hard pedal.

The fuel line on the left looks very similar to the vacuum hose on the right, but note the differences in the printing.

From this angle, you can see that the fuel line on the left has a thinner wall than the vacuum hose on the right.
So how do you avoid the counter guy selling you the wrong hose? When you go to your local parts store, remember to ask for a 11/32” vacuum hose. As an industry standard, a vacuum hose is only measured in 32nds of an inch. Therefore, you will only see 7/32”, 9/32”, or 11/32” when looking for vacuum hose.
Now, if you are driving a hot rod with a power brake booster, we suggest walking out to the garage right now and popping the hood to see if you have it right. What you never knew might be a problem could be one!
Pick yourself up a proper vacuum hose from us right now!
Whether you’re installing new brakes on your classic car or working on an existing system, brake drag can be a frustrating and challenging thing to diagnose and locate. On a positive note, the problem is usually a pretty simple repair once you find the culprit.
What Is Brake Drag?
Brake drag happens when the brake pads or shoes don’t release completely when the brake pedal is released, and is typically a result of mechanical issues or hydraulics. It is highly recommended to fix the dragging brakes as soon as possible, because it can lead to overheated parts and potential damage to the braking system, or worse yet, an accident.
Referring to the checklists below will help you identify and repair your brake system’s brake drag woes so you can get back out on the road.
Mechanical Brake Drag
Master Cylinder Push Rod Length
1. On manual brake systems, the pedal needs a small amount of free play at the top of the travel. This guarantees that the pushrod is not keeping any pressure on the master cylinder. If there is a small pre-load, this will keep a small amount of pressure in the system causing the brakes to drag.
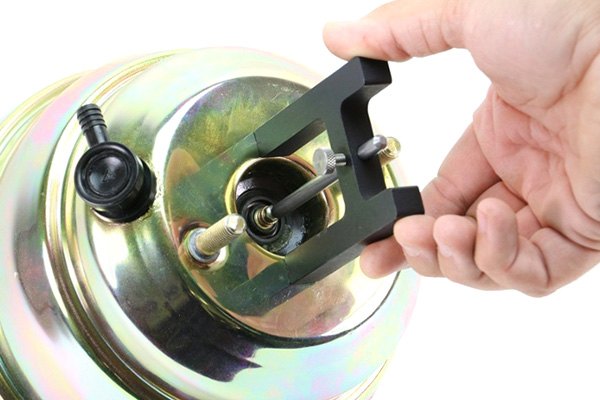
Brake Booster Push Rod Length
2. Similar to the above scenario, the pin between the brake booster and the master cylinder can be too long. This will not allow the master cylinder to release completely. To correct this problem, it is necessary to determine the distance between the push rod and the piston. This needs to be approximately .020”. To aid in measuring this and for visual assistance, refer to Got A Soft Pedal? Don't Forget The Booster Pin to Master Cylinder Gap Master Power offers a handy Push Rod Depth Gauge Tool that every good mechanic should have in their toolbox.
Caliper Piston
3. Just like with the master cylinder not releasing causing the brake drag, a caliper not releasing and staying applied can do the same thing. If only one position is dragging, this could be the case.
Misalignment of Caliper
4. If the caliper is not properly aligned with the rotor, a drag can occur. This is usually caused by a bent caliper mounting bracket or severely warped rotors and pads. To correct, visually inspect the alignment between the caliper and rotor. If the bracket is bent, replace as necessary. If the rotors are warped, you will experience a drag while turning the rotor followed by the rotor turning easy. This situation will then repeat for each rotor rotation. To correct this, replacement of the rotors and pads will be necessary.
Incorrect Wheel Bearing Installation
5. This situation could come across as a brake drag but is a drag due to wheel bearings being seized due to a lack of grease or over tightening during installation. The easiest way to diagnose this is to remove the caliper from the rotor and turn the rotor. If the drag still is present, then the problem is internal with the bearings. At this point, replace as necessary and reinstall to the proper torque value and pre-load.
Hydraulic Brake Drag
Heat
1. Heat can cause brake drag in several ways but the most common scenario is due to brake fluid reaching and exceeding its boiling point. Verify there is adequate clearance between brake lines and exhaust and depending on the location of the master cylinder or booster/master, make sure there is ample room between those components and the engine or exhaust. To correct, shield the components in the system as necessary and replace the brake fluid with a high quality brake fluid such as our Pentosin Brake Fluid.
Collapsed Flex Hose
2. There are a minimum of three brake hoses on the vehicle, and these lines are often overlooked when freshening up a brake system. The internal wall in the hose can come apart or wear out allowing the fluid to not release keeping pressure on the system. Just like coolant hoses, brake hoses should be inspected for signs of wear on a regular basis.
Master Cylinder Piston
3. While similar to a mechanical brake drag scenario mentioned above, the piston inside the master cylinder may not be releasing. This situation is usually remedied by replacing the master cylinder.
Master Cylinder Overfull
4. We see a lot of brake drag problems caused by a master cylinder that is too full of fluid. If the system is overfull, there may not be enough room in the reservoirs for the fluid to return. In most master cylinders, it is necessary to have the fluid level approximately 1/2" from the top. This will allow the fluid to return and leave the proper air space in the master cylinder.
Metering Valve
5. In a brake system with disc front and drum rear, there is a valve in the system known as a metering valve or hold-off valve. This valve basically allows the rear drums to apply first in the system. It does this through a small sliding valve operating on spring pressure. If this valve is sticking or has become weak, it may be keeping pressure applied to the system. If this is the case, replace the valve as necessary.